
Growing cannabis can be daunting and challenging. There are many who have attempted but didn’t find much success due to a number of reasons. Some are caused by the natural imbalance of the environment, but in most cases, it is due to the cannabis grower himself.
Growing cannabis successfully begins with understanding environmental factors that are vital to a healthy crop.
Growing cannabis – whether for commercial purposes or personal consumption – may seem hard but did you know that with proper knowledge and understanding, you’ll soon get the hang of it? An in-depth look at the most common issues you’ll encounter and what you can do to correct them will have your cannabis plants growing the way you want them to!
Common issues associated with growing cannabis
Overwatering
Overwatering is one of the biggest mistakes new cannabis growers often make. Probably it’s because they feel the need to give their plants everything and will overdo a lot of things. One of these is overwatering.
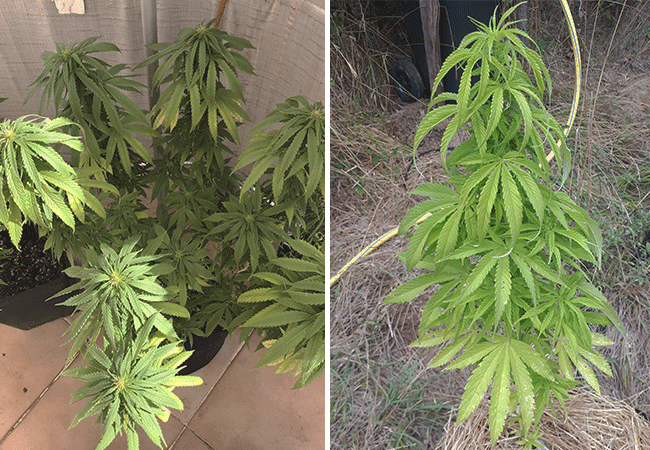
By overwatering your plant, you soak the roots so much that they can’t get enough oxygen and slowly die. Cannabis shows signs of overwatering by wilting, having a droopy look, yellowing, and leaves falling off prematurely. The best way to tell that you are NOT overwatering your cannabis plant is to first pick up the pot when it’s dry, just before you water it. Water your plant, then pick up the pot again after you’ve watered it. (This is enough reason why it’s smart to use light pots.) When you water, you want to give your plant just enough to see a bit of water coming out of the bottom, not gushing or pouring out. Then you know you’ve given the plant just enough water.
Besides the weight of the pot, another way to test if your plant needs water is to stick your index finger a couple of inches into the soil. Feel the soil at the tip of your finger – if it’s almost dry then it’s time to water your cannabis plant again. You should allow some time for the top of the soil to dry out between waterings. If it’s still moist the plant does NOT need to be watered. You can also use a moisture meter which will tell you the level of moisture down in the soil. You can get these at garden supplies or hydro shops near you.
To prevent overwatering, you can also add more perlite to your soil or hydrogen peroxide to your water for extra oxygen. This will eventually kill all bacteria if there are any in the soil. After watering, wait a few days to water again. Plants like a good watering, followed by a couple of days to dry out in between.
As you can see, it is very easy to affect plant growth by overwatering. Here are pictures of what overwatering looks like in cannabis plants.
Underwatering
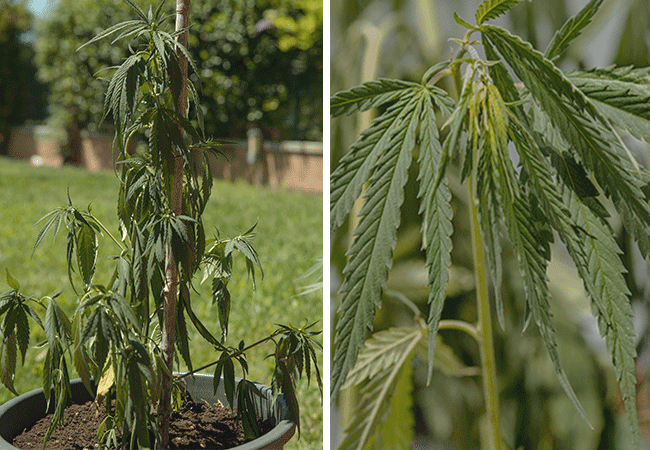
Underwatering can show the exact same symptoms as overwatering – significant droopiness along with hard topsoil. However, underwatering seems to get the leaves to droop more than overwatering does. The fan leaves will droop closer to the stalk and won’t be as yellow as overwatering looks like. To avoid this, make sure every watering you give your plants is a good watering. Use a bit more water than you normally do, because your plants will need a good quenching once in a while. This ensures that the bottom roots and root hairs get sufficient water to produce newer growth.
The picture below shows leaves drooping close to stacks due to underwatering.
Cold Temperatures
Certain cannabis varieties such as equatorial Sativa don’t take well to cold temperatures. However, the plant will withstand cooler temperatures than it otherwise could if you keep its roots warmer. Also, keep in mind that phosphorus gets poorly absorbed in colder temperatures and there will be purpling of the stems and leaves if this happens. This is different from the natural purple color of cannabis stems. Cold temperature problems usually show a deeper purpling in stems and leaves. This is the same case when environmental triggers cause cannabis plants to change color in flowering. Take note, however, that genetics can also play a huge role.
The pictures below show what cold temperatures can do to cannabis.
The easiest way to address cold temp issues in cannabis is to install a temperature controller in your grow space. This device enables you to manage air intake and keep the ambient temperature well within ideal parameters so you can avoid problems associated with excessive temperature variations. You may also opt to install an electric heater but the high cost of electricity is something that will get you thinking twice. Also, heaters can have a drying effect on the air in your grow space, so you may need to work on humidity levels as well.
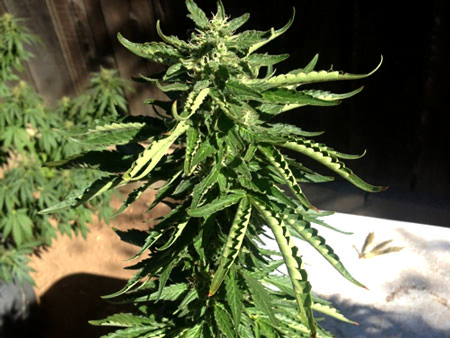
Heat Stress
Cannabis plants can only tolerate a certain amount of light and heat. If conditions are below or beyond optimal levels, your plants will begin exhibiting signs of heat stress on their leaves. These include yellow or brown spotting in sections that are exposed to too much light or heat. Leaves will also turn dry and can fold inward or curl up or down. The serrated edges of leaves may also take on a burnt appearance and flip upward as shown in the picture below.
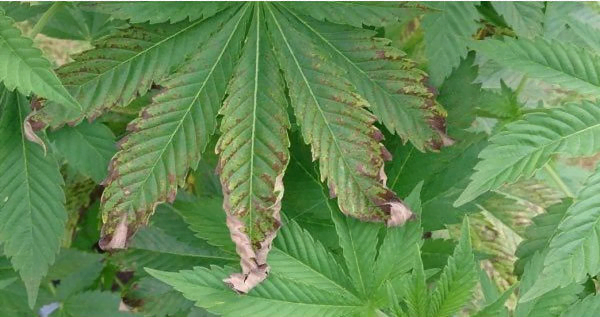
The only way to fix this is to control the heat by moving the lights away from the plant and enable better ventilation in your grow space. Find means to lower temperature levels and promote better air circulation if heat is the problem. Small oscillating fans blowing above the canopy can help prevent the formation of hotspots on plants that are directly under your grow lights. You may also opt to position grow lights further away if heat is an issue.
For successful cannabis cultivation, you should maintain temperature levels that are comfortable for your plants to encourage optimal growth. It doesn’t take rocket science to do this – just think that it gets too hot for you in your grow area, then it’s probably too hot for your plants, too!
Nutrient Burn
Nutrient burn is one of the most common issues a new cannabis grower is likely to encounter. The reason for this is because a newer grower will likely use chemical nutrients most of the time and follow the directions on the box. This is a huge NO-NO! You should also consider other factors like your particular cannabis strain, the age and size of your plant, and the type of soil mixture or grow medium you are using.
While there are no set guidelines to using nutrients to feed your cannabis babies, I can give you good advice on how to start off on the right foot so you don’t run into a nutrient burn problem.
First, play safe by going light on feeding. Bear in mind that it’s always possible to add more when lacking, but it’s impossible to take out when you’ve put in too much. Also, there’s a lot of difference between chemical and organic nutrients. While chemical nutrients are more accessible, they burn way easier than their organic counterparts. If you are a newbie in cannabis cultivation, opt for organic versions as there’s less chance of running into nutrient burn problems.
I recommend not using more than ½ teaspoon of chemical nutrients per gallon of water. Unless the plants are very big (5 feet+) then it’s safe to use 1 teaspoon per gallon of water. When your plants first emerge, you want to wait at least two weeks before feeding them, unless you’re cultivating in a soilless mixture like PRO-MIX. The cotyledons (its first set of round looking leaves) are what give the plant its food until they get the first two or three sets of leaves. If your plants are in a soilless mixture and are over the first week, you can feed a weak amount of nutrients, like ¼ teaspoon per gallon of water. Soilless mixtures are different from soil plants and soilless plants need to be fed more when using this mixture.
As for soil mixtures, there are a lot of different kinds of soil out there. Using a rich soil mixture is not recommended for seedlings that are under two weeks old. A seed starter mixture would be a better and safer option. Seed starter mixtures are weak in nutrients, so it will not burn the seedlings but will provide them enough to get past the seedling stage. The downside is you have to transplant into a better soil mixture after two weeks of age. If you decide to start with this mixture, do not put your seedlings into a big pot; rather, use disposable cups or seedling pots.
Soil nutrients are enough to supplement new plants until they are two weeks old so there’s no need to feed them. In fact, using fertilizers before two weeks will most likely kill your plants.
Nutrient burn causes cannabis leaf tips to appear yellow or brown and burnt. They can also look twisted and crispy. Depending on the severity, nutrient burn can show many different symptoms. These symptoms usually manifest on the lower part of the plant when it’s young, and everywhere else as it grows older.
Pictures below show mild nutrient burn. The severe nutrient burn will show tips of leaves that are burnt and crispy.
To fix the problem when you have a nutrient burn, you’ll want to flush out the plants with lots of water at a 3:1 ratio. That means three gallons of water per gallon of soil. Do this daily for about a week then you can resume nutrient feeding as soon as the plant recovers after 7 to 10 days.
If using hydroponic growing systems, change out the reservoir by flushing out any lines, cleaning out the entire system and replacing with plain water for the first hour. Then, start out with lower parts per million (PPM). It’s good to clean out your system every two weeks and replace it with fresh water and nutrients. Some cannabis enthusiasts even change everything every week!
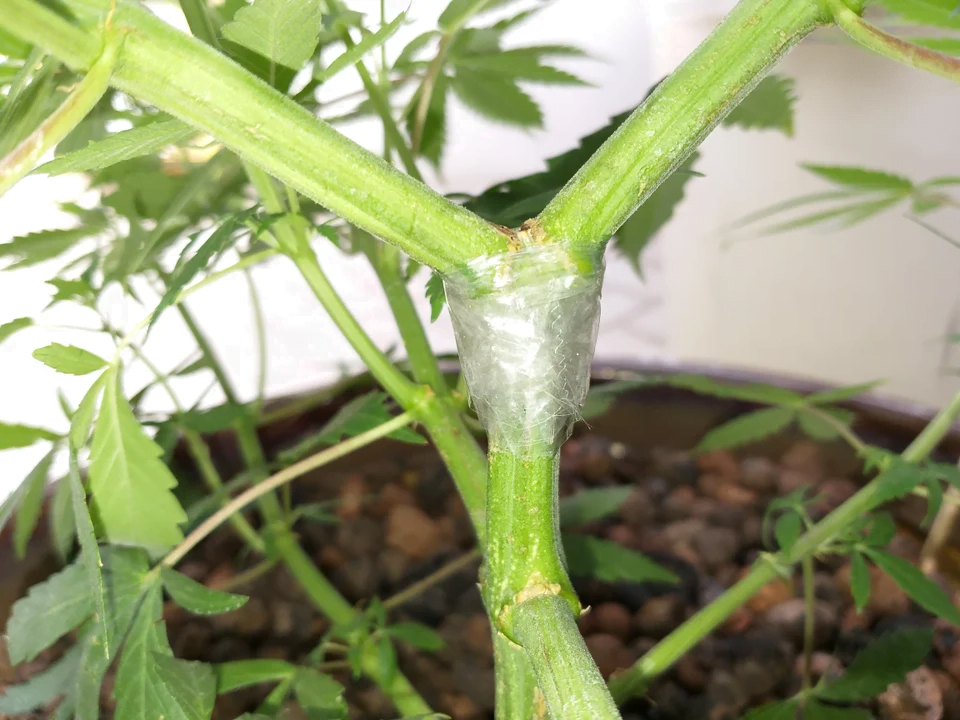
Stem Problems
From time to time, cannabis growers will experience stem breakage which can arise from a number of factors including stem training, dropping something on your cannabis plant, animal damage, or harsh weather conditions. No matter how it happened the most important thing is to not panic.
Fixing a broken stem is not really a problem. Splint it with something and tape it in place. Marijuana possessed that great ability to pull through and bounce back even after a stem break. Give your plant a week or so to recover and it will start to grow beautifully again.
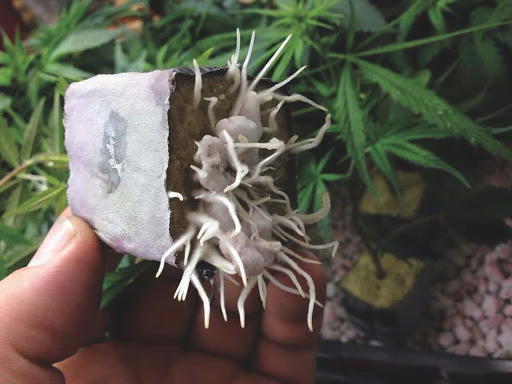
Cloning Problems
A lot of times clones will yellow when trying to root. Some yellowing is alright, but if the yellowing is taking over and roots have not shown, you need to ensure your growing medium is secured tightly to the stem. Letting in any air will dry out the lower stem and delay root growth. You should also make sure that moisture in the medium is just right – it must not be saturated. Lighting does not have to be too close when they are unrooted. Light will only need to be closer after roots have shown as depicted in the picture below.
When it comes to feeding, plain, pH-adjusted plain water is good enough until the clones have grown roots. Feeding clones with nutrients before they have rooted will only kill them. Also, initial feedings need to be a little weak and must be done with caution.
If you are using a dome for cloning, you want to make sure that you do not mist your plants heavily. Heavy misting will spoil your cannabis and delay rooting. That’s not to mention that your plants will have to be “weaned” from their dome if you mist them a lot. Your plants will droop quickly if taken out of the dome after they have been rooted.
If you are having problems with droopy clones, you may want to try an anti-droop spray. This will help the plants to stop drooping as bad. You can kill clones by not weaning them out of the dome or cause stress and stunt them. I have my own cloning method that stops the weaning process while using a dome, so remember not to soil your clones by misting them daily, making sure your medium is moist enough (not saturated) to last through the cloning process.
If the temperature in the medium where the roots are at is under 65℉, you’ll want to use a heating mat. Temps of around 75-80℉ are optimal. Anything over 80 will cause transpiration and dry out your medium too quickly and roots will not have a chance of growing. Colder temperature slows down root growth and causes yellowing and stunting. Yellowing on the leaves of a clone is not always a sign of cold temperatures; there could be other problems like the medium being too saturated, roots being delayed from the cloning method, or water temperatures being too warm if using a bubble cloner. Leaves that turn yellow on clones means it is using stored nutrients from the leaves to help it try to root. Clones that become cold before having a chance to root will less likely root at all.
Some strains are more difficult to clone than others. Some can also root faster and some can take much longer. It seems Indica dominant strains have a much easier time cloning, whereas Sativa dominant strains are pickier and require “tweaking” your cloning method if you want to get a higher success rate.
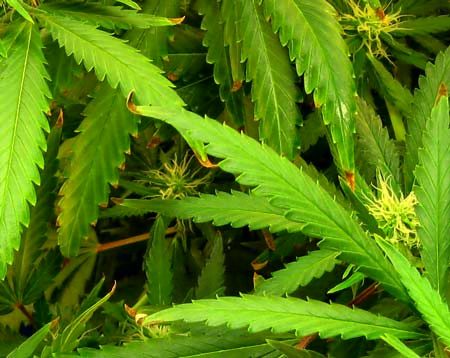
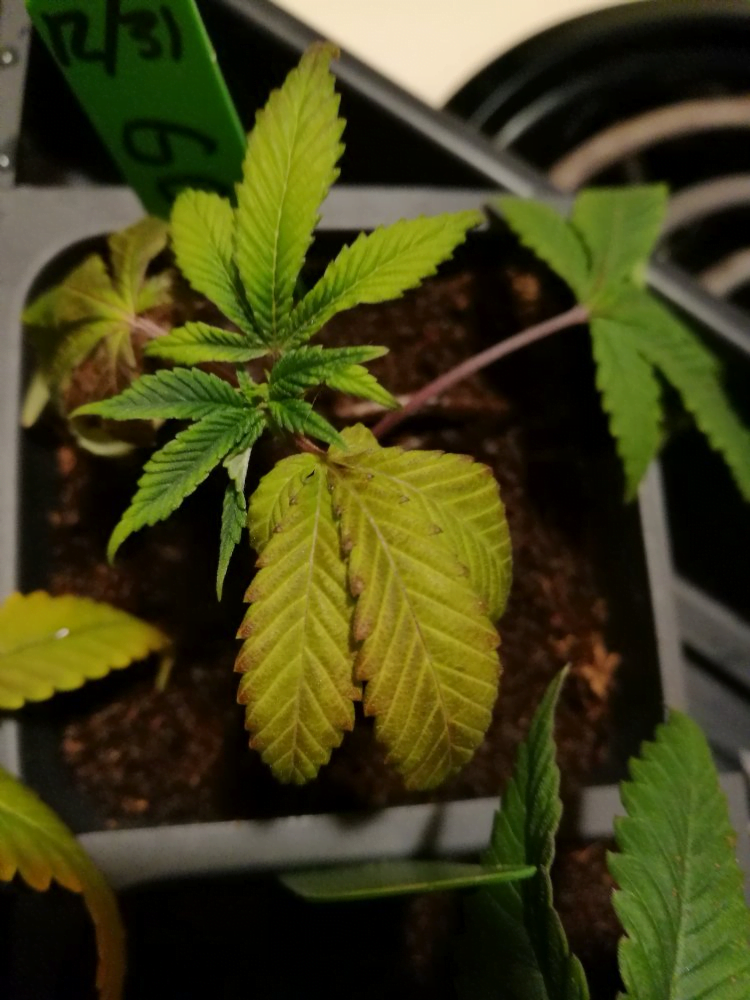
Yellowing leaves on cuttings
When unrooted clones start to yellow it means they are either not touching the rooting medium well enough or there’s just too much CO2. In most cases, yellowing of leaves occurs in an unrooted cutting beginning with the largest and oldest leaves because they are closest to the light source. A little yellowing is normal when the cutting begins to root and can be a sign of the cutting making use of its oldest leaves as a food source while it is forming new roots. You can supplement feeding with plain tap water that is pH adjusted. Never give cuttings any fertilizers until they have rooted as this will only kill them.
The picture below shows yellowing in older leaves of cutting.
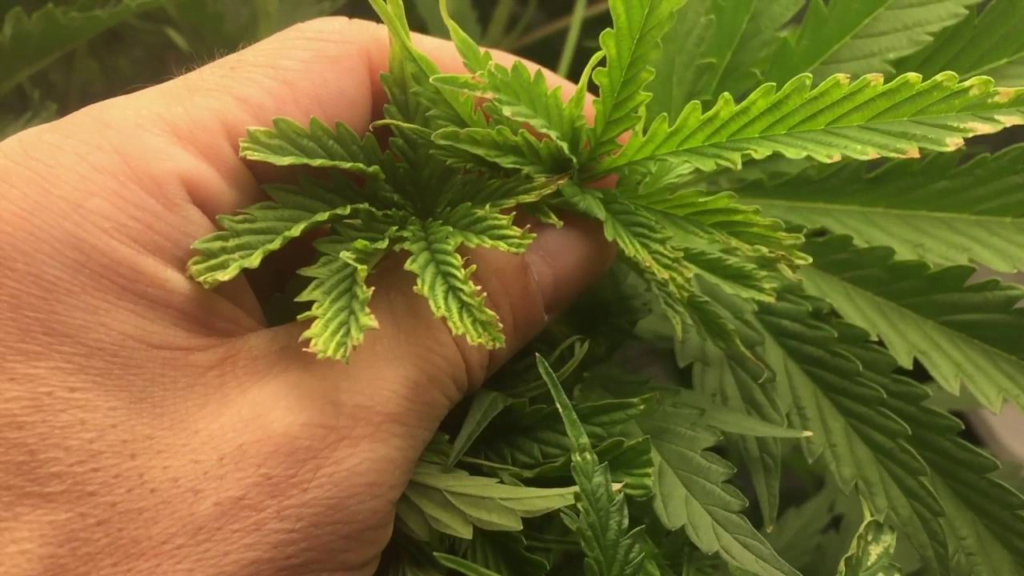
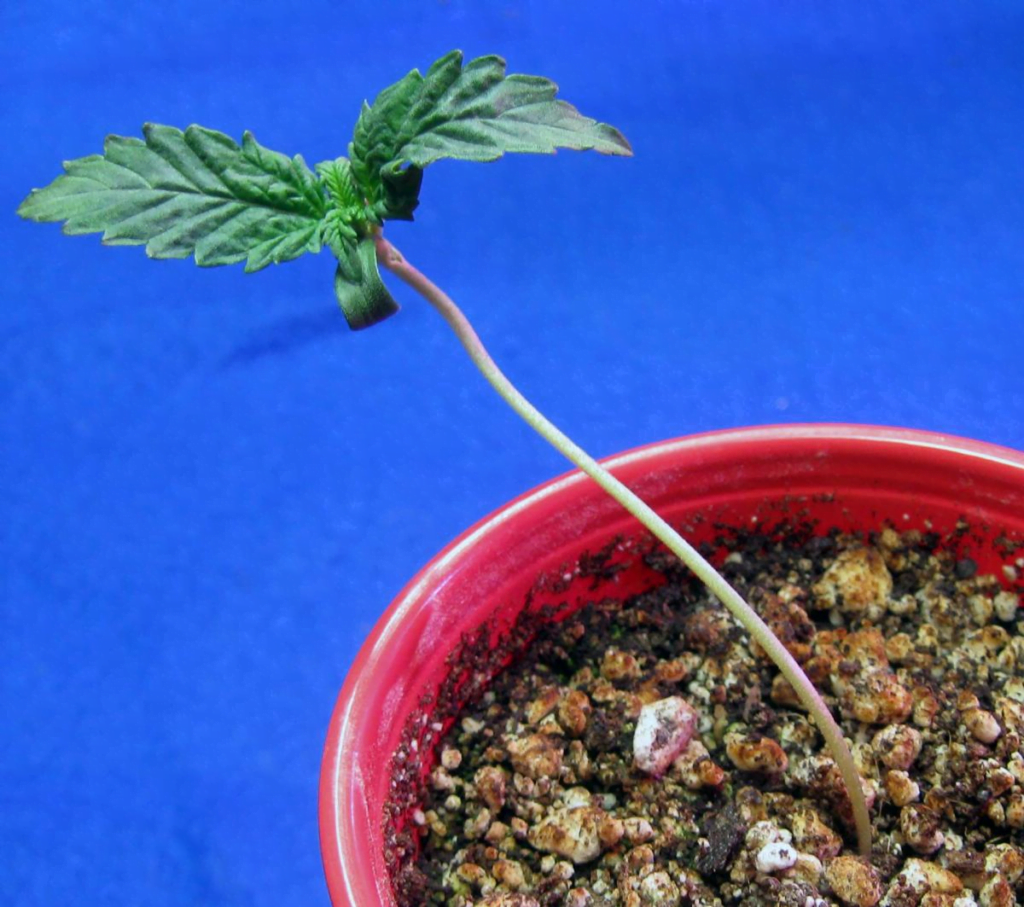
Seedlings Stretching
If your plants are stretching then it can be caused by a few things –not enough light, light not close enough, or using the wrong kind of light. Stay away from incandescent and halogen bulbs as they produce more heat than needed. Instead get a high-pressure sodium (HPS) bulb or metal-halide (MH) lamp, or even some compact fluorescent. HPS will keep your plant short and stubby while cool fluorescent tubes and compact fluorescent (blue spectrum) and MH will keep your plant bushy. Soft whites will keep your plants tall and using a mix of all these light types will make your cannabis plants tall and bushy. Nothing wrong with having mixed spectrums really. Better yet, just go grow outside if you can do it safely and save lots of energy and money!
The picture below is an example of a seedling having a stem that’s longer than usual due to stretching.
Sodium Toxicity in Water
Water does play a huge role when you are trying to grow healthy plants. Not only do our plants need water, but there are many different kinds of water to use: bottled water, tap water, distilled water, and reverse osmosis water (RO), and Distilled. Out of all these different kinds of water, there’s one thing you want to make absolutely sure of – they must NOT have sodium in them.
Sodium will completely lock out any nutrient you have given your plants single-handedly. Sodium is the first thing plants absorb when taking in nutrients and when this happens, a buildup of salts occurs and locks out nutrients in your soil/hydro setup. Using water that has sodium – like from bottled water, tap water, or from a water softener – is what you want to avoid. If your home has a water softener, then you must either buy bottled water from a fill station or make a bypass valve before the pipe gets to the water softener.
A vast amount of problems will surface among plants suffering from sodium toxicity. How your crop fares in the final outcome depends on how healthy and resilient your cannabis strains are. Plants are most affected when they are young and the worst damage happens when they are under three weeks old. Nitrogen, calcium and magnesium are the nutrients that are locked out first.
The picture below shows the effect of too much sodium in water.
Sodium toxicity results in droopiness, twisting and stunting. There is discoloration on the leaves which starts at the base and moves up towards the middle. Sometimes your plants will not recover or will not grow normally. In order to fix this problem, flush your soil out with a lot of clean, sodium-free water.
Flush with clean water twice the amount of what your pot can hold. So if you have a three-gallon size pot, use six gallons of water to flush it out. If you have a hydro system, flush with clean water, let it sit for about 15 minutes and then flush all the water out. Then, put more clean water in and apply your nutrients.
Hard Water
Hard water gets in the way of nutrient absorption. In order to find out if you have hard water, you can buy test strips from a pool store or hardware. Test strips will tell you the pH, dissolved minerals (mostly calcium and magnesium), and other things that may be in your water. Anything over 200 ppm is considered hard water, but the higher numbers like 350 or more are what you want to be alerted about.
You may want to consider installing a reverse osmosis system if you have hard water in your water source. The reverse osmosis system not only cleans the water but also removes calcium and magnesium. High levels of calcium and magnesium are what contribute to hard water. If you choose to use reverse osmosis, you will need to supplement your plants with a little more calcium and magnesium.
Hermaphrodite Pollination
It’s true that female cannabis plants can turn into males. The factor is strain-induced and dependent on conditions in your growing environment. What some seed companies won’t tell you when you are growing their feminized strains is that in order to achieve 100% female success rate, you have to be growing in prime conditions. That means establishing the best relative humidity and temperature levels, having optimal lighting, proper watering, and feeding your cannabis strains with the right nutrients.
Feminized seeds are not the only kind that turns into male and female; ANY strain and any plant can turn into a hermaphrodite. If your plants keep turning into hermaphrodites, there are some things you can do. First, you need to see if the strain you’re growing is prone to turning hermaphrodite. If you are not familiar with a particular strain, the best thing to do is not grow it at all; instead, get some seeds you’re already familiar with. Next, make sure your growing conditions are good: nice fresh air, proper balance of nutrients, adequate lighting with no light leaks in your flowering room. Light leaks can cause the plants to become hermaphrodites.
Left to right: male, female and hermaphrodite cannabis.

If your plants have turned into hermaphrodites and pollinated your plants, there is nothing you can do about it, those beans the plant produces will carry the hermaphrodite trait and if you grow them out you may be right back to where you started. You can, in fact, grow female plants from hermaphrodite seeds, but they are going to be very unstable.
When you put your other plants into flowering, you want to make sure that everything in the room is washed down: growing equipment, hoses, nutrient bottles, pots, and everything else. You don’t want pollen that stayed behind to pollinate your girls this time around. Washing down everything with watered down bleach or soap will prevent old pollen left on walls and equipment from re-pollinating your plants.
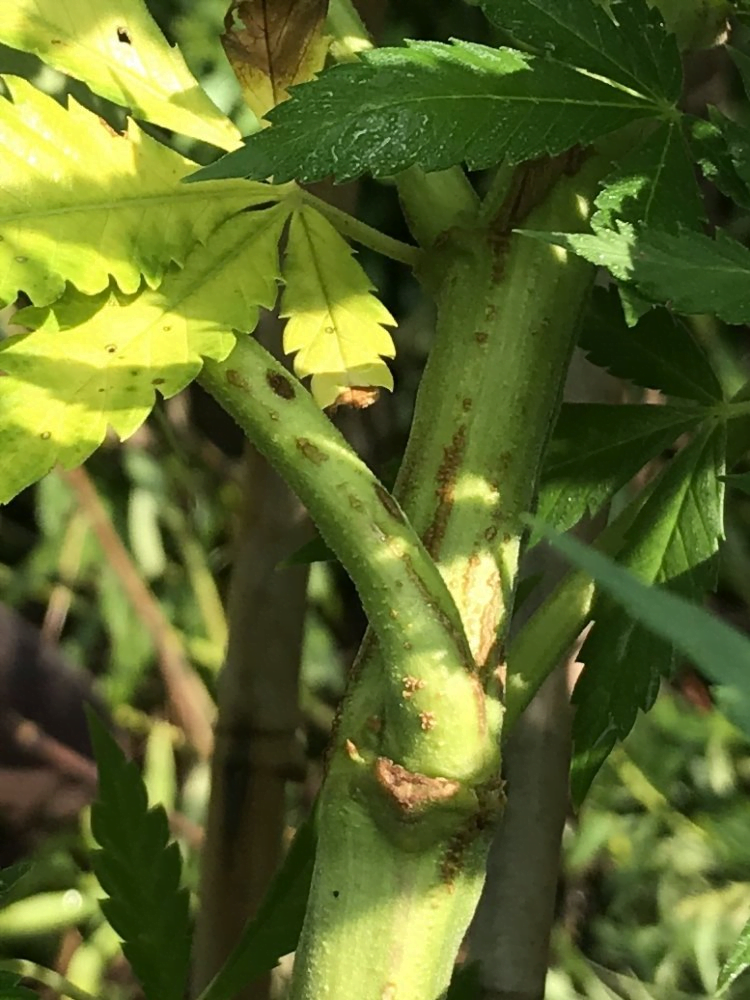
Stem Canker (Stem Rot)
Stem cankers form on stems from a fungus similar to white and yellow leaf spot. Weather can affect the way stem cankers live; wet humid weather is what makes this fungus thrive. Canker fungus afflicts cannabis the same way as white and leaf spot fungus, entering through an open cut, wound, pruned wound, or pest infestation that has caused damage by eating leaves or chewing on the stems or stalks. Transmission is also possible via rain, animal attacks, low-stress training (LST) or contaminated tools and equipment.
Damage to cannabis manifests in the form of a yellowish-brown discoloration on the lower portion of the stalk. Later, the leaves turn yellow and fall off, and the plant dries out and dies. Cankers form mostly on the stems but in severe cases, spots appear on the leaves from internal tissue being deprived of nutrients and water. Specifically, cankers form along the 3rd, 4th and 5th stem nodes. Cannabis plants affected with stem cankers are more susceptible to fungus and viral infections from airborne spores.
The picture below shows stem canker on cannabis.
You can prevent stem cankers in the same way as fungus problems: treat stem wounds with H202, make sure your plants are free of pests and sterilized all equipment before and after using them. Spraying your cannabis plants with fungicides during peak months of fungus activity also helps greatly. It’s very important that you catch this fungus early – once the damage has been done, the only way to get rid of this is to chop the plant down and treat the infected area. Having other plants near and or around this area can and will re-affect other plants when a new season starts.
Fusarium Wilt
Fusarium Wilt is one disease cannabis growers dread the most. Plant health, environmental factors and cannabis strain have a lot to do with whether or not Fusarium wilt will take over your grow operations. This pathogen primarily affects cannabis and hemp but can affect other plants as well. However, the damage isn’t as bad as it is on cannabis. You may ask why and it’s all because this pathogen was bred specifically to attack wild cannabis plants and growers who grow their plants outdoors. There is no form of organic control for this disease because the fungus is so strong and not susceptible to much of anything unless you nip a Fusarium wilt problem in the bud.
Fusarium wilt causes internal damage to vascular lines and blocks the plant’s ability to carry water and nutrients. Symptoms included drooping, wilting, stem collapse and discoloration, with leaves turning yellow and becoming necrotic. While the yellowing of leaves may look like a nutrient deficiency, this isn’t exactly the case. With Fusarium wilt, leaves will yellow and stay on the plant, whereas with a nitrogen deficiency the leaves will yellow and fall off.
While not affecting the roots, Fusarium impacts plant cell walls and reveals a red-brown color inside the tissues. Stems will change color from normal green and purple hue to a dark purple to blackish color. This pathogen can get confused with root rot because the symptoms are nearly the same, but the roots are not affected. The clogging effect inside is what causes the external symptoms. This fungus is a real killer to cannabis plants – any remaining plants that survived are usually stunted. Fusarium thrives in warm moist temperatures, which is why cannabis growers in southern states have it the worst.
There are only a few ways to control this fungus. One is to fumigate the grow area to kill the pathogen in the soil while it is dormant, so when you grow in this area again your plants are much less likely to get it. The only other way your cannabis plants could get the disease is from airborne spores penetrating through open wounds on your plant’s leaves, stems, and stalks. Plants that produced seeds when it was infected with Fusarium wilt should not be used, as the pathogen stays dormant on the seed and attacks when the seedling emerges and causing the “damping off” effect and thus killing the seedling before it even has a chance to grow its real first set of leaves.
Acidic soil helps boost Fusarium wilt so if your soil is acidic, counteract this by using dolomite lime or green sand. Using potassium and calcium-enriched organic nutrients can help fight off and prevent Fusarium wilt, while excessive amounts of nitrogen and phosphorus can speed it up.
Pictures below show Fusarium wilt infection.

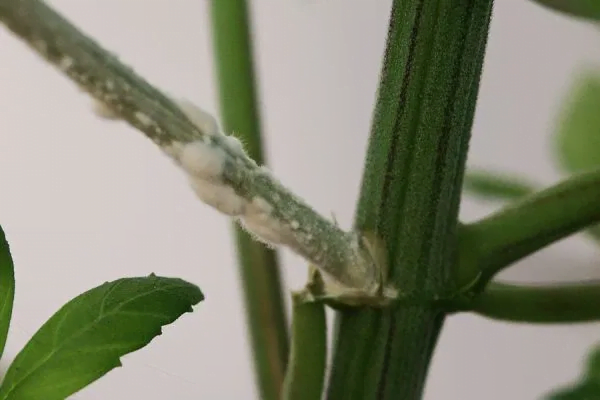
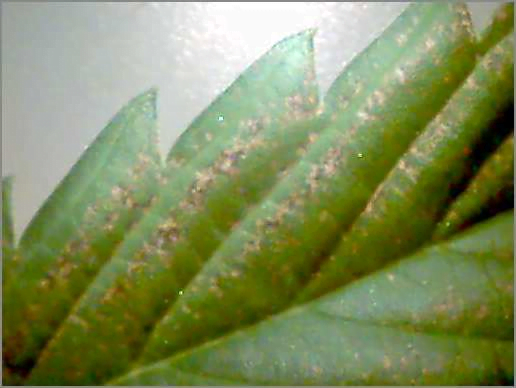
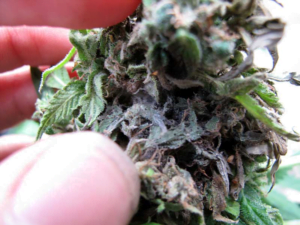
Powdery Mildew
Mildew spores can be brought into a grow space by wind, air ventilation, clothes, pets, and contaminated equipment. It infects many parts of the cannabis plants including stems, stalks, leaves and buds. Spores can remain dormant until environmental factors trigger it, like high humidity, cool temperatures, and poor air circulation. Symptoms of powdery mildew in cannabis include white spots and blotches of furry stuff that you can wipe off. It often starts on darker areas of the plant which do not get a lot of light and spreads to the top.
The picture below shows powdery mildew infestation on cannabis.
It’s much easier to address a powdery mildew problem during vegetative growth than in the later stages of flowering. Nighttime temperatures and moisture trigger spores to be released, causing mildew to eventually coat the plant and hamper the process of photosynthesis. When left untreated, powdery mildew will suffocate the leaves, causing them to yellow and eventually die off. If cannabis is in the flowering stage, buds will be coated in a white powdery substance and have a stale, moist smell.
High temperature and humidity levels over 65% can trigger active powdery mildew spores and very early detection in flowering plants is crucial. Otherwise, you won’t get any buds and mold will cripple your harvest, resulting in significantly lower yields. Strains vary in susceptibility to molds, just like other pathogens, nutrient requirements and care.
To treat your cannabis plants for powdery mildew, isolate infected plants, bring down humidity and increase negative air pressure in your grow room. Ideally, humidity levels should be around 40-50%. It will also help to keep plants spaced apart to allow maximum airflow and minimize plant to plant infection. If you have a mildew problem with your fans running, take them down for a thorough cleaning as they can help spread spores in your grow space. You will also have to wash down everything with mild hot water and a bleach solution.
Exercise caution when removing infected leaves so as not to knock spores into the air. It will help to use a bag over them and tie it shut. Be sure to use hydrogen peroxide on stems that have open wounds after infected leaves have been removed. Also, make adjustments when watering your cannabis plants. DO NOT water or foliar feed when the lights are going to be out as this will cause higher humidity. Instead, do these when the lights first come on and there will be at least five hours of light following watering and foliar feeding. Using a sulphur burner also helps vaporize spores in the air and is another way to prevent and kill powdery mildew. (Do not apply sulfur when the air temperature is near or over 90°F.)
Controlling mildew outdoors can be somewhat of a challenge as you can’t control outdoor temperatures or environmental factors. For preventive purposes, spray cannabis leaves with Vapor Gard or Wilt Pruf to keep a mildew infestation at bay.
There are various organic pest control methods you can use to address a powdery mildew problem. The list below will work in killing and preventing powdery mildew for both indoor and outdoor grow operations:
- AQ10
- Serenade
- Plant Shield
- Garden Disease Control
- Fungicide containing lime and sulphur
- JMS Stylet Oil
- Saf-T-Side Spray Oil
- Sunspray Ultra-Fine Spray Oil
- Neem Oil
- Neem 2
- Kaligreen
- Safer Garden Fungicide
- Concern Copper Soap Fungicide
- Guardian Angel
- Serenade Garden Disease Control OMRI
- Safer 3-in1 Garden Spray OMRI
- Sulfur Vaporizer
- Organocide
- SM-90
- Malatox
- Garden Sulphur
- Sulphur Burner
- Sodium Bicarbonate
- Chi
- Mother Nature’s Karanja Oil
- Concern Copper Soap Fungicide
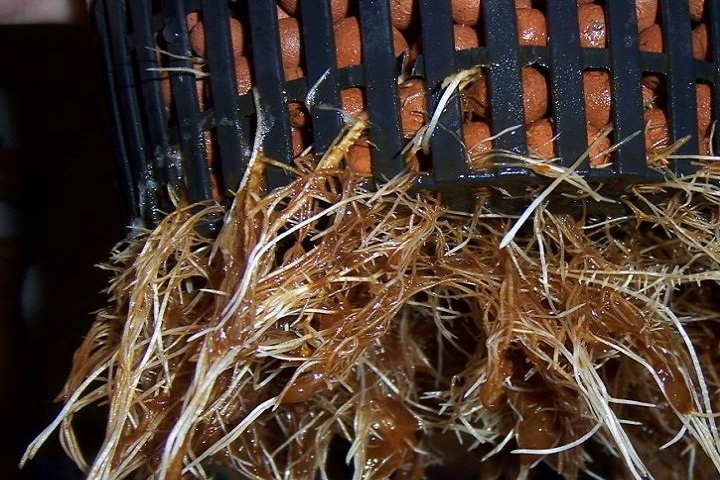
Root Rot
Temperature and dissolved oxygen (DO) levels are critical to cannabis root health and values that go below or beyond the ideal parameters can result in root rot. Temperature and DO have an inverse relationship ⇁ the lower the temperature, the higher DO levels are and the higher the temperature, the lower the DO levels. The ideal temperature range for growing cannabis is between 65 – 72℉ to allow optimum oxygen levels for root growth and development.
Overwatering and poor drainage are the two main causes of root rot problems in cannabis. Soil or any other growing medium will retain moisture too long for the roots to dry out, causing them to rot in the long run. Once you detect a root rot issue, you can add hydrogen peroxide (H2O2) to your water to kill bacterial growth caused by the rotting. Depending on the level of infestation, you can cut off affected parts (fibrous roots only, not taproots) and use the H2O2 mixed with water as a disinfecting dip before putting your plant back to the system. Take note that your system also needs to be disinfected if you have a root rot issue.
Adding beneficial bacteria to your water will help greatly to treat and prevent root rot and other root-related plant diseases. They also help make nutrients readily available to your cannabis plants. Among the more popular ones in the market are Hydroguard, Great White, and Rooters which can be used safely on both hydroponic and soil grows.
The picture below shows root rot in a hydroponic system.
The picture below shows the buildup of toxic pathogens as roots die and decay.
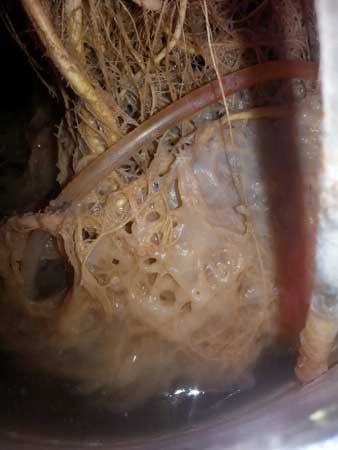
The picture below shows bud termination and dry down due to root rot.
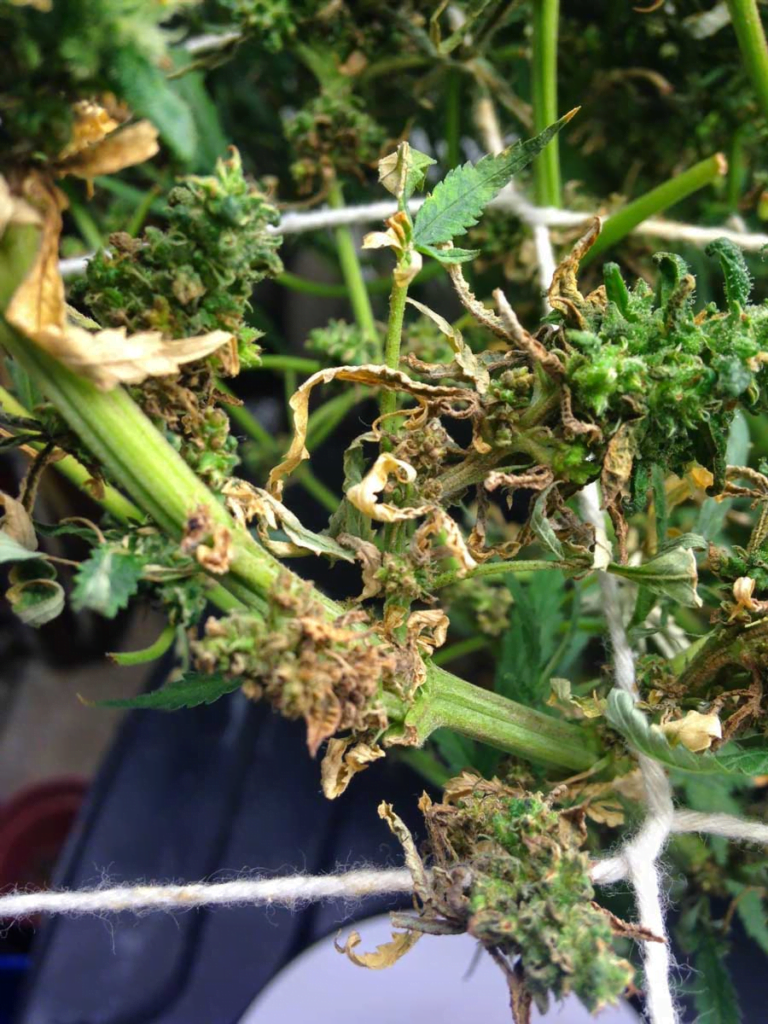
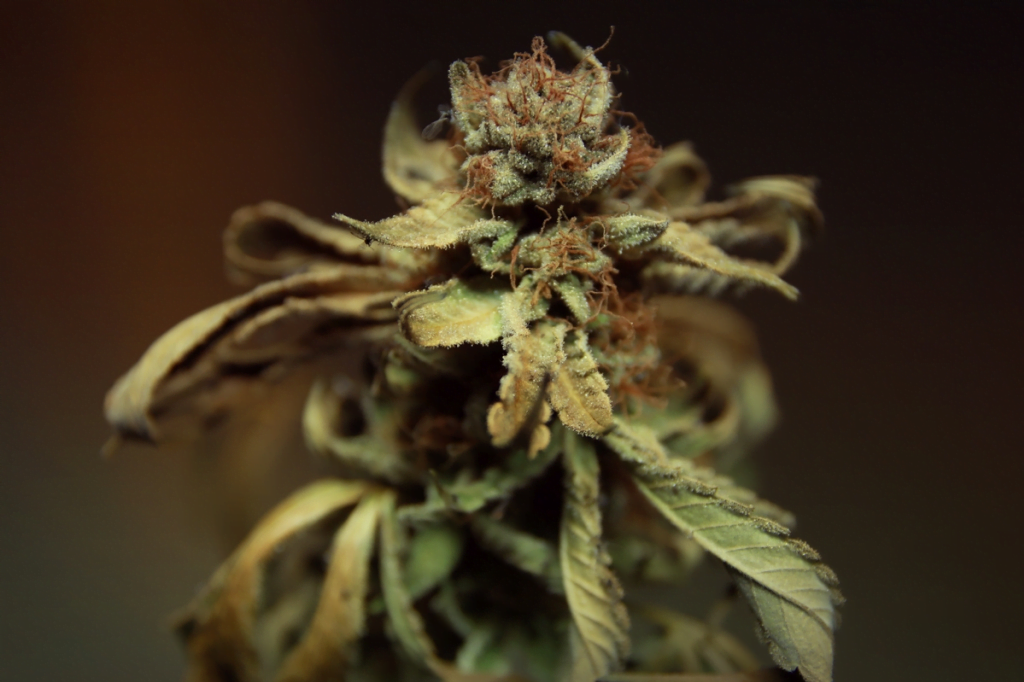
Bud Rot
Bud rot is among the most devastating fungus diseases that afflict cannabis and can destroy your entire crop in a single week. Also known as grey mold or botrytis, bud rot thrives in cool temperate climates with high humidity levels. It isn’t location-specific and can infest marijuana plants in all life stages. Contamination happens via dusty grey spores that are transmitted in wind and water or via humans and pets.
Bud rot begins as fluffy white growth in the exterior of buds. The growth darkens quickly into a grey or brown color and burrows deeper into dense buds as the disease progresses. Considered as every marijuana grower’s worst nightmare, bud rot kills everything along its path, including seeds and seedlings sitting in the soil.
You can prevent bud rot by decreasing humidity (below 50% is ideal) and increasing airflow in your grow room. Keeping leaf density down and removing dead or dying material from your plant also helps to increase air exposure and avoid bud rot.
Watering and foliar feeding should also be done in the earlier part of the day so there’s sufficient time for plants to dry off before darkness falls (or before your turn the lights off in case you’re growing marijuana indoors). Also, you can form a protective barrier using neem oil or sesame oil spray which prevents mold from germinating. Neem2 is a ready-made solution you can easily purchase from a nearby gardening supplies store.
The picture below shows bud rot in the early stages.
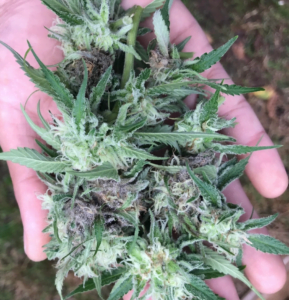
Here’s a picture of bud rot in denser colas.
Organic Cannabis Pest Control
Now that you’re armed with added knowledge and understanding about environmental conditions and cultivation practices that can make or break your cannabis grow operations, growing marijuana isn’t really that daunting after all. A little bit of love and dedication to what you’re doing, plus help and advice from an organic pest control expert that specializes in cannabis crops make that perfect mix for healthier, pest-free marijuana plants!
Ant & Garden Organic Pest Control in Beaverton Oregon specializes in innovative and organic pest control solutions to solve any problem you may have with your cannabis plants. We only use OLCC-approved ingredients in our safe and organic proprietary insecticides that can kill common cannabis pests, bugs, and mites in all their life stages.
Whatever concern you may have regarding cannabis – be it mites, pests, mold, the wind, weather, or seasons – Ant & Garden Organic Pest Control is here to help! CALL US today to learn more about our services or to schedule an appointment for an onsite visit and assessment.
